Grabbing an Actor’s Performance

In 2008 concepts and methods developed working on 3D conversion for IMAX films combined to solve a problem at Zoic studios for the Bad Robot TV series FRINGE. Those IMAX3D films required large amounts of match moved geometry to generate depth information. During that time I experimented projecting two dimensional tracking information to the surface of a placed 3D model, as a simple “look-at” constraint — capturing movement that was much more accurate than that produced by hand animation. Unfortunately it was too late in production to use it effectively.
The FRINGE team faced a similar, though more formidable challenge. Tasked with adding moving detail in the veins of a character grimacing dramatically in pain. Similar work was done for the previous episode, of a melting airline pilot, Which was entirely tracked with 3D solvers, and tightly matched via brute-force hand animation. That shot required a lot of deconstruction, and 2D tracking/warping to fit it in the composite, but our combined effort won a Visual Effects Society award for the Supervisory team. For this episode, I watched the animation team struggle again with matching a performance for a week hand-tracking this footage but I was only in the compositing team at the time. Remembering how hard it was to lock the last performance down in the composite (a lot of late nights), I figured my experiments for IMAX might be worth a try.
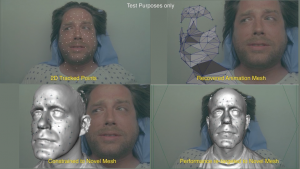
That evening, in my small home office I extrapolated my earlier concept, and wrote supporting code in After Effects and Maya to handle multiple track points, building a system which uses 2D tracking points exported from Syntheyes to warp 3D meshes. This video, and very little sleep, was the result:
The system converts several 2D track points, in this case without any on-set tracking markers, into 3D points at the camera plane, and projects them along the camera frustum to the appropriate depth of a simple recovered point model. This is used to deform a higher-order mesh, as opposed to calculating the more intense number of polygons each time. The recovered mesh is derived as much as possible from the original tracking, but at times can be a low-resolution re-creation as long as control points roughly line up with the tracked position.
With no scan of the actor, my own mesh from a scan acquired at the SIGGRAPH conference from 3DMD — one of my favorite booths to visit there — would have to do. It was good enough for demonstration purposes. The plastic deformation around the lips was especially interesting — lips which were still merged together. You can see some distortion in outlying regions, but that can be corrected later. At this point it was an unsanctioned test that I was funding, so just enough detail to sell the idea.
Since this was extracting the movement from existing footage, as opposed to a full 3D performance capture system, I coined the term “Performance Transfer,” or “pTran” for short, and constantly referred to the work as digital prosthetics.
I waited patiently the next day in dailies, as all the footage was reviewed, and asked if they could run the shot I had uploaded to the server. There was stunned silence for a moment, and I was expecting to get chewed out for overstepping my bounds (not the first time, but I did become one the lead artist of the show later on). Andrew Orloff broke the tension when he said “We might just go with that.”
This system, and the scripts I wrote at home became one of the mainstays for digital makeup at Zoic for many years, and the tracking principles it used solved many other problems in the standard tracking pipeline. The show creators continually pushed the limits of the system, which I modified in my studio, and brought in as needed.
This Andrew Orloff interview speaks somewhat of the “proprietary” performance Transfer system and about the digital makeup work at about 30 seconds in. At the time, this quality of facial tracking was unheard of in television production, and the interviewer asks directly about it.
This kind of work is now easily produced with off-the-shelf software like SynthEyes or with new plug-ins for NUKE compositing software. So much has changed in the Visual Effects and digital makeup (dMFX) arena in the last ten years, that what was once bleeding edge research, quickly becomes a blip in history as multiple developers replicate the success. This is one of those blips.
The original shots that the work was built upon are easily solved with 2D techniques, and is probably how I would approach it today (as I did on many other types of shots in FRINGE later on, in combination with this method). Were it not for the desire to build this as a 3D solution, the system would never have come about. It is amazing how innovation is sometimes driven by small decisions, more often than it is with the “big idea.”
So to all the bug eating, face melting, worm ridden, squid-faced, morphing images that FRINGE gave us on a weekly basis, I present my 2013 digital makeup reel as a tribute. Sometimes it is fun to play in JJ’s sandbox.
This reel contains many examples using this toolset, as well as multiple other techniques. Acknowledgement to Mike Kirylo, Christina (Boice) Murguia, and Rodrigo Dorsch, for their fantastic work with these toolsets. (Warning, some of the imagery is a bit intense.) FRINGE was a wildcard every week, and the team was constantly finding new solutions in a very short period of time.
AG
If you like this article, learn more about the rise of Digital Makeup (dMFX) in this article:
Fringe to Falling Skies — The Unwanted Rise of Digital Makeup


This article was revised to correct some grammatical voice errors, and flesh out further details.